This page is intended as a how-to guide for checking ABS "idiot light" error codes displayed on MKII Toyota MR2s. This page contains:
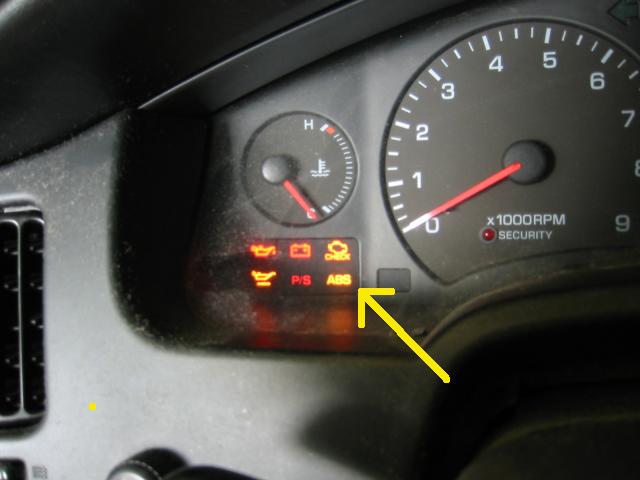
The gauge panel has an amber "ABS" light that normally turns on when you start the car and then turns off. It's on the bottom right side of the 2 X 3 grid of lights immediately below the temperature gauge. In the event of a malfunction of an ABS system component, the light will remain lit. The ABS system will enter a "fail-safe" mode where it essentially acts just like standard power brakes. Although it will not harm the car to drive it in this condition, I'd recommend getting the ABS fixed as soon as possible.
The easiest way to figure out which component of the ABS system is broken is to check the ABS error code. This can be done in only a few minutes with basic tools. IMHO it's worth it to do this check yourself, even if you plan on taking the car to a shop for repairs. A little knowledge can prevent getting billed for unnecessary work.
Required tools/supplies:
Disclaimers:
Step 1:Turn the ignition switch to the "on" position. Don't start the car, just turn the ignition on.
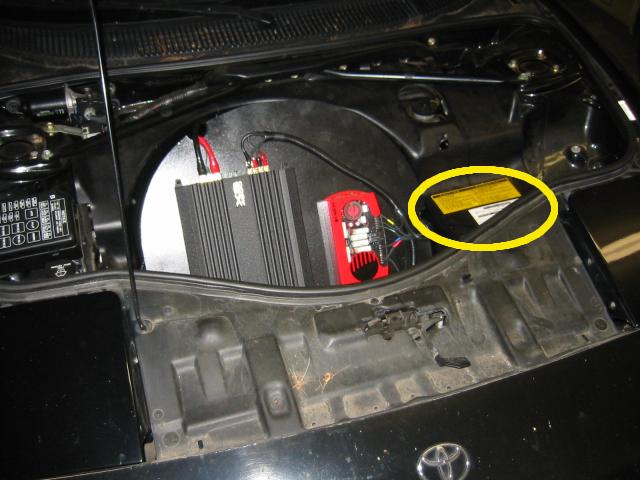
Step 2:Open the hood to get access to the ABS service connector. The connector is under the plastic trim piece in the area circled below. You can remove the spare tire and then remove the plastic trim piece entirely, or you can do as I did and just pry it back some.
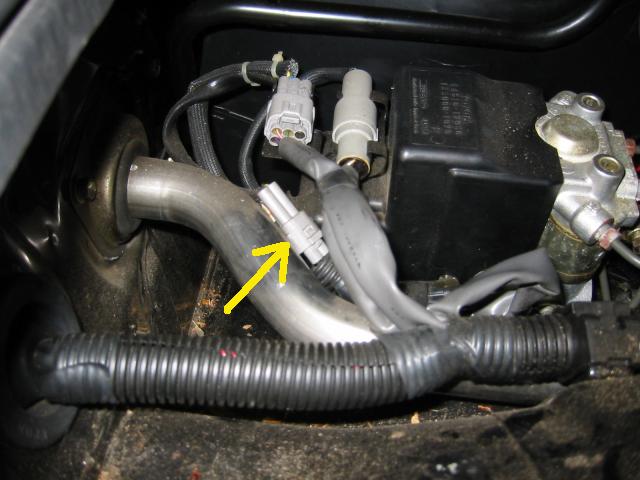
Step 3:Disconnect the service connector. The service connector is the 2-wire gray plug shown in the picture below. This picture was taken from the driver's side fender looking into the front trunk. It helps to use a screwdriver to depress the tab when pulling the two halves apart.
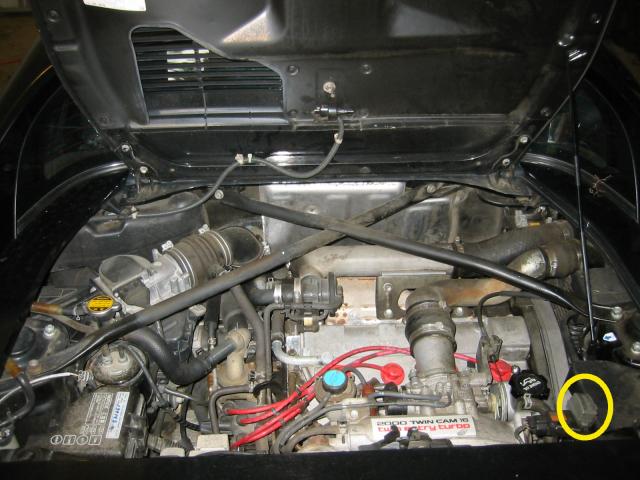
Step 4:Open the engine lid to get access to the diagnostic terminal. It's a small gray plastic box at the right rear of the engine opening.
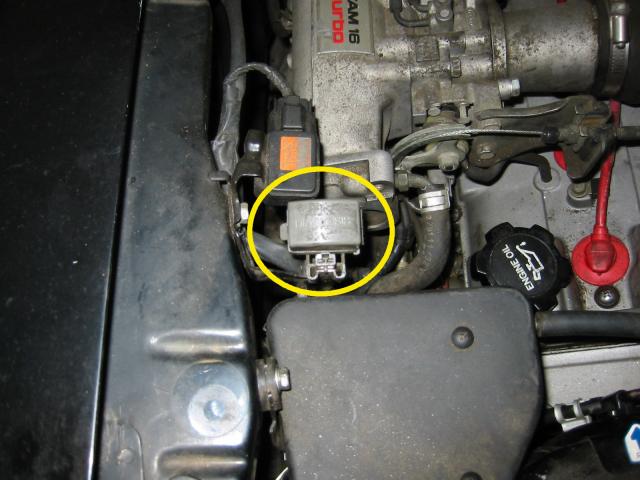
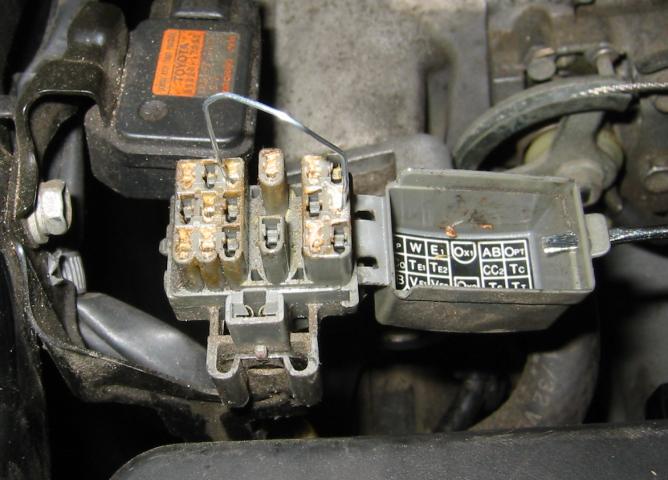
Step 5:Open the lid to the diagnostic box cover and connect terminals Tc and E1 with a paper clip bent into a "U" shape. A small piece of solid core wire works too. The box lid is hinged on the right and has a latch on the left side which I pried open with a flathead screwdriver. Or, just use your hands. On the inside of the lid is a labeled map of the terminals, just like a box of chocolates. Nice touch.
Step 6: At this point, your dash will be lit up like a Christmas tree. This is normal. Grab a pencil and paper, ignore the other indicators, and look at the ABS light. It will flash one or more two-digit error codes. Count the flashes and write them down. The sequence is [first digit code 1] short pause [second digit code 1] medium pause [first digit code 2] short pause [second digit code 2] ... and so on, depending on how many error codes are present. The whole sequence will repeat indefinitely, so no hurry writing it all down. Just be patient and double check your counts.
| Code Number | Diagnosis |
|---|---|
| 11 | open circuit in solenoid relay circuit |
| 12 | short circuit in solenoid relay circuit |
| 13 | open circuit in pump motor relay circuit |
| 14 | short circuit in pump motor relay circuit |
| 21 | open or short circuit in 3 position solenoid of front right wheel |
| 22 | open or short circuit in 3 position solenoid of front left wheel |
| 23 | open or short circuit in 3 position solenoid of rear wheels |
| 31 | front right wheel speed sensor signal malfunction |
| 32 | front left wheel speed sensor signal malfunction |
| 33 | rear right wheel speed sensor signal malfunction |
| 34 | rear left wheel speed sensor signal malfunction |
| 35 | open circuit in front left or rear right wheel speed sensor |
| 36 | open circuit in front right or rear left wheel speed sensor |
| 41 | abnormal battery voltage ( < 9.5 or > 17 ) |
| 51 | pump motor of actuator locked or open circuit in pump motor circuit in actuator |
| ALWAYS ON | computer malfunction |
Note that if you disconnect the service connector BEFORE turning on the ignition, it will cause a "11" code in addition to whatever else may have been wrong. In my case, I had codes "33" and "35", both due to a bad right rear sensor. Once repairs are made, you'll need to clear the codes to restore ABS function. This is covered in the next section.
Clearing ABS error codes
Clearing the codes is similar to checking the codes, with a few minor differences. Mainly, you don't disconnect the service connector. If you checked the codes as above, repaired whatever was broken, and are ready to clear the codes all in one sitting, more power to you, just remember to reconnect the service connector before proceeding. In my case, I had to order a part after reading the codes, so I reconnected everything while waiting for the part to arrive. It probably won't harm anything to drive with the service connector disconnected, but I didn't care to find out. Also note that supposedly you can reset the codes simply by disconnecting the battery. I didn't try this method because I didn't want to lose all my stereo settings. In hindsight, that sounds pretty lame, but it was my reasoning at the time.
Step 1: Turn the ignition switch on. Again, you should have the service connector CONNECTED as you do this.
Step 2: Connect the Tc and E1 terminals of the diagnostic box, as in Step 5 above
Step 3: Get in the car and pump the brake pedal at least 8 times within 3 seconds. You don't need to press hard, just quickly. Once the codes are cleared the ABS light will blink continuously at 0.5 second intervals. That's it, you're done. Take out the paper clip, close everything up and your ABS system should be functioning normally.
 Up to the top